
カメラで垂直に資料の平面を撮影したかった場合に、正対できずに上下左右の遠近感が出てしまうことがあります。しかし射影変換を行うことでそのずれを補正することが可能です。Python/OpenCVを使うことで誰でも簡単に画像の自由変形(射影変換)を使うことができます。本記事では射影元を画面から選択し、射影変換後ファイルを保存する処理について記載します。(日本語フルパス対応)
CONTENTS
射影変換で画像を自由変形させるには?
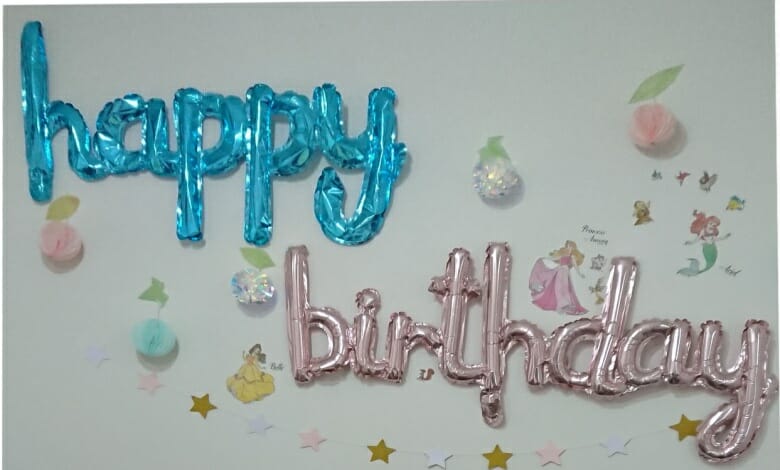
射影変換とは、画像の形状を変形させる変換手法の1つです。コンピュータグラフィックスの分野では画像を様々な形状に変形させることで、2Dを3Dに見立てたり、表面にテクスチャを貼ったりしたりすることができます。例えば以下のように遠近感が上下で異なる画像に対して射影変換を行うことで正対した画像にすることが可能です。このように撮影時のちょっとしたブレを補正することが可能となります。
遠近感の異なる画像

正対した画像(射影変換後)
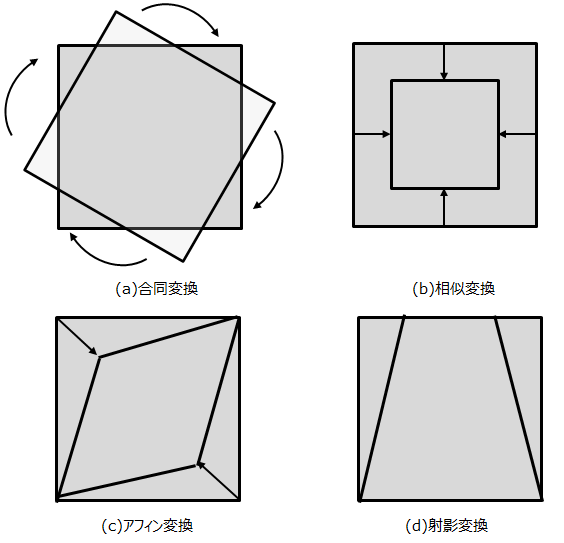
上で行った方法は射影変換ですが、画像の変換には下図のようないくつかの変換方法があります。
(a)合同変換 :変換前後にて画像は完全一致で回転のみを許す変換する方法
(b)相似変換 :(a)に加え、拡大と縮小を可能にした変換方法
(c)アフィン変換:(a)(b)に加えひし形の変形を可能にした変換方法
(d)射影変換 :(a)(b)(c)の全ての機能に対してさらにどんな四角形にでも変換できる方法
射影変換のコード
インポートするパッケージ
import cv2
import numpy as np
import matplotlib.pyplot as plt
import glob
import configparser
import os
import sysCode language: JavaScript (javascript)
引数からのファイルフルパス配列取得
Pyinstallerなどでexe化し、Shell:SendToにショートカットを作成することで、右クリックの「送る」にて選択したファイルを順次処理することが可能となります。
引数のファイル名の取得と、ファイルパスの取得、拡張子のチェックを行い、メイン処理に渡しています。
if __name__ == "__main__":
    # 引数からのファイルフルパス配列取得
    args = sys.argv
    for i,file_path in enumerate(args):
        # 拡張子取得と拡張子チェック処理
        root, ext = os.path.splitext(file_path)
        if ext.lower() == '.png' or ext.lower() == '.jpg' or ext.lower() == '.jpeg' or ext.lower() == '.webp':
            # 現在のファイル名取得
            file_Name = os.path.splitext(os.path.basename(file_path))[0]
            main = Main(file_path,file_Name)Code language: PHP (php)
画面での選択機能と射影変換処理
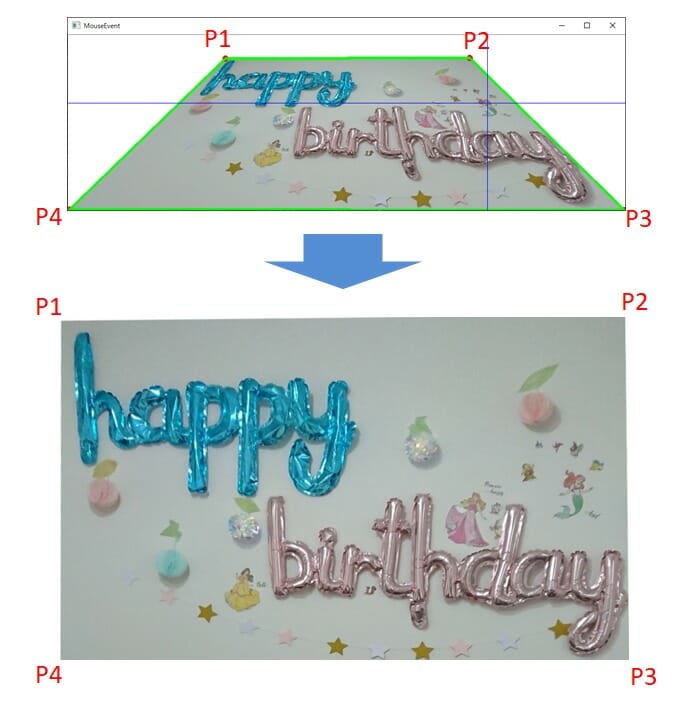
画面にて射影範囲を選択するための画像用意とパラメータ設定、そして射影変換処理と結果の保存処理となります。画面にて射影範囲を選択する際にはクリックした位置をウィンドウ上の座標から元の画像の座標に変換する必要があります。そして射影変換では以下の図のように変換前後の対応点p1-p4をそれぞれ対応している順番通りに選択が必要となります。画像は元の名称+”-fix”+拡張子にて保存されます。
class Main():
    def __init__(self,file_path,file_Name):
        # 画像読み込み処理と射影範囲選択処理用画像作成
        self.img = imread(file_path,cv2.IMREAD_COLOR)
        self.orgHeight, self.orgWidth = self.img.shape[:2]
        # 幅の小さい方に合わせて画像作成を行う
        self.sizeH = (int(self.orgWidth*700/self.orgHeight),700)
        self.sizeW = (1000,int(self.orgHeight*1000/self.orgWidth))
        if self.sizeH[0] > self.sizeW[0]:
            self.ratio = 1000/self.orgWidth
            # 拡大縮小用の関数
            self.ImgShow = SizeCheck(self.sizeW[0],self.sizeW,self.img)
        else:
            self.ratio = 700/self.orgHeight
            # 拡大縮小用の関数
            self.ImgShow = SizeCheck(self.sizeH[0],self.sizeH,self.img)
        # 画面からのマウスイベント取得用設定
        self.wname = "MouseEvent"
        cv2.namedWindow(self.wname)
        self.npoints = 4
        self.ptlist = PointList(self.npoints)
        cv2.setMouseCallback(self.wname, onMouse, [self.wname, self.ImgShow, self.ptlist])
        cv2.imshow(self.wname, self.ImgShow)
        cv2.waitKey()
        cv2.destroyAllWindows()

        # 変換前後の対応点を設定 p1-p4はそれぞれ対応しているので順番通りに選択が必要
        # クリックした位置をウィンドウ上の座標から元の画像の座標に変換
        self.p_original = np.float32([[int(x/self.ratio) for x in self.ptlist.ptlist[0]], \
            [int(x/self.ratio) for x in self.ptlist.ptlist[1]],\
            [int(x/self.ratio) for x in self.ptlist.ptlist[2]],\
            [int(x/self.ratio) for x in self.ptlist.ptlist[3]]])
        self.diff_width1 = np.abs(int(self.ptlist.ptlist[0][0]/self.ratio) - int(self.ptlist.ptlist[1][0]/self.ratio))
        self.diff_width2 = np.abs(int(self.ptlist.ptlist[2][0]/self.ratio) - int(self.ptlist.ptlist[3][0]/self.ratio))
        self.diff_height1 = np.abs(int(self.ptlist.ptlist[0][1]/self.ratio) - int(self.ptlist.ptlist[3][1]/self.ratio))
        self.diff_height2 = np.abs(int(self.ptlist.ptlist[1][1]/self.ratio) - int(self.ptlist.ptlist[2][1]/self.ratio))
        # 幅と高さの小さい方に合わせる。
        if self.diff_width1 < self.diff_width2:
            self.width = self.diff_width1
        else:
            self.width = self.diff_width2
        if self.diff_height1 < self.diff_height2:
            self.height = self.diff_height1
        else:
            self.height = self.diff_height2
        self.p_trans = np.float32([[0,0], [self.width,0], [self.width,self.height], [0,self.height]])

        # 変換マトリクスと射影変換
        self.M = cv2.getPerspectiveTransform(self.p_original, self.p_trans)
        self.img_trans = cv2.warpPerspective(self.img,self.M, (self.width,self.height))
        self.ImgCut = self.img_trans

        self.ImgCutHeight, self.ImgCutWidth = self.ImgCut.shape[:2]
        # 射影した画像のサイズ調整
        self.size = (780,int(self.ImgCutHeight*780/self.ImgCutWidth))

        self.ImgShow = SizeCheck(780,self.size,self.ImgCut)
        # ファイルを元の名称+"-fix"+拡張子にて保存
        basename = os.path.basename(file_path)
        dirname = os.path.dirname(file_path)
        root, ext = os.path.splitext(file_path)
        imwrite(dirname +'/'+ file_Name +'-fix' + ext, self.ImgShow)
マウスクリック時の座標保存処理
マウス移動時の座標表示、マウスクリックを行った際に4点までの座標のウィンドウ上への表示と保存を行う必要があります。追加時の表示、保存処理を以下に記載します。
# マウス位置のリスト作成処理
class PointList():
    def __init__(self, npoints):
        self.npoints = npoints
        self.ptlist = np.empty((npoints, 2), dtype=int)
        self.pos = 0

    # マウス位置追加保存処理
    def add(self, x, y):
        if self.pos < self.npoints:
            self.ptlist[self.pos, :] = [x, y]
            self.pos += 1
            return True
        return False

    if event == cv2.EVENT_LBUTTONDOWN:
        # レフトボタンをクリックしたとき、ptlist配列にx,y座標を格納する
        if ptlist.add(x, y):
            print('[%d] ( %d, %d )' % (ptlist.pos - 1, x, y))
            cv2.circle(img, (x, y), 3, (0, 0, 255), 3)
            cv2.imshow(wname, img)
        else:
            print('All points have selected.  Press ESC-key.')
        if(ptlist.pos == ptlist.npoints):
            cv2.line(img, (ptlist.ptlist[0][0], ptlist.ptlist[0][1]),
                     (ptlist.ptlist[1][0], ptlist.ptlist[1][1]), (0, 255, 0), 3)
            cv2.line(img, (ptlist.ptlist[1][0], ptlist.ptlist[1][1]),
                     (ptlist.ptlist[2][0], ptlist.ptlist[2][1]), (0, 255, 0), 3)
            cv2.line(img, (ptlist.ptlist[2][0], ptlist.ptlist[2][1]),
                     (ptlist.ptlist[3][0], ptlist.ptlist[3][1]), (0, 255, 0), 3)
            cv2.line(img, (ptlist.ptlist[3][0], ptlist.ptlist[3][1]),
                     (ptlist.ptlist[0][0], ptlist.ptlist[0][1]), (0, 255, 0), 3)
            cv2.imshow(wname, img)
Code language: HTML, XML (xml)
cv2.imread、cv2.imwriteの日本語対応化
cv2.imread、cv2.imwriteは日本語を含むフルパスを引数として設定した場合、正常に処理ができません。そのため、以下のように新たに関数を用意してあげる必要があります。
# 日本語パス対応のためのimread関数作成
def imread(filename, flags=cv2.IMREAD_COLOR, dtype=np.uint8):
    try:
        n = np.fromfile(filename, dtype)
        img = cv2.imdecode(n, flags)
        return img
    except Exception as e:
        print(e)
        return None

# 日本語パス対応のためのimwrite関数作成
def imwrite(filename, img, params=None):
    try:
        ext = os.path.splitext(filename)[1]
        result, n = cv2.imencode(ext, img, params)

        if result:
            with open(filename, mode='w+b') as f:
                n.tofile(f)
            return True
        else:
            return False
    except Exception as e:
        print(e)
        return FalseCode language: PHP (php)
コードのまとめ
上記で紹介したコードをまとめて記載すると以下のようになります。
# インポートするパッケージ
import cv2
import numpy as np
import matplotlib.pyplot as plt
import glob
import configparser
import os
import sys

# 日本語パス対応のためのimread関数作成
def imread(filename, flags=cv2.IMREAD_COLOR, dtype=np.uint8):
    try:
        n = np.fromfile(filename, dtype)
        img = cv2.imdecode(n, flags)
        return img
    except Exception as e:
        print(e)
        return None

# 日本語パス対応のためのimwrite関数作成
def imwrite(filename, img, params=None):
    try:
        ext = os.path.splitext(filename)[1]
        result, n = cv2.imencode(ext, img, params)

        if result:
            with open(filename, mode='w+b') as f:
                n.tofile(f)
            return True
        else:
            return False
    except Exception as e:
        print(e)
        return False

# マウス位置のリスト作成処理
class PointList():
    def __init__(self, npoints):
        self.npoints = npoints
        self.ptlist = np.empty((npoints, 2), dtype=int)
        self.pos = 0

    # マウス位置追加保存処理
    def add(self, x, y):
        if self.pos < self.npoints:
            self.ptlist[self.pos, :] = [x, y]
            self.pos += 1
            return True
        return False

# 拡大縮小にて処理方法を変更するためにチェックを行う処理
def SizeCheck(thresh,size,img):
    orgHeight, orgWidth = img.shape[:2]
    if thresh > orgWidth:
        # 拡大処理 INTER_CUBIC
        return cv2.resize(img, size, interpolation = cv2.INTER_CUBIC)
    else:
        # 縮小処理 IINTER_AREA
        return cv2.resize(img, size, interpolation = cv2.INTER_AREA)

# マウス・クリック位置表示処理
def onMouse(event, x, y, flag, params):
    wname, img, ptlist = params
    if event == cv2.EVENT_MOUSEMOVE:  # マウスが移動したときにx線とy線を更新する
        img2 = np.copy(img)
        h, w = img2.shape[0], img2.shape[1]
        cv2.line(img2, (x, 0), (x, h - 1), (255, 0, 0))
        cv2.line(img2, (0, y), (w - 1, y), (255, 0, 0))
        cv2.imshow(wname, img2)

    if event == cv2.EVENT_LBUTTONDOWN:  # レフトボタンをクリックしたとき、ptlist配列にx,y座標を格納する
        if ptlist.add(x, y):
            print('[%d] ( %d, %d )' % (ptlist.pos - 1, x, y))
            cv2.circle(img, (x, y), 3, (0, 0, 255), 3)
            cv2.imshow(wname, img)
        else:
            print('All points have selected.  Press ESC-key.')
        if(ptlist.pos == ptlist.npoints):
            cv2.line(img, (ptlist.ptlist[0][0], ptlist.ptlist[0][1]),
                     (ptlist.ptlist[1][0], ptlist.ptlist[1][1]), (0, 255, 0), 3)
            cv2.line(img, (ptlist.ptlist[1][0], ptlist.ptlist[1][1]),
                     (ptlist.ptlist[2][0], ptlist.ptlist[2][1]), (0, 255, 0), 3)
            cv2.line(img, (ptlist.ptlist[2][0], ptlist.ptlist[2][1]),
                     (ptlist.ptlist[3][0], ptlist.ptlist[3][1]), (0, 255, 0), 3)
            cv2.line(img, (ptlist.ptlist[3][0], ptlist.ptlist[3][1]),
                     (ptlist.ptlist[0][0], ptlist.ptlist[0][1]), (0, 255, 0), 3)
            cv2.imshow(wname, img)

class Main():
    def __init__(self,file_path,file_Name):
        # 画像読み込み処理と射影範囲選択処理用画像作成
        self.img = imread(file_path,cv2.IMREAD_COLOR)
        self.orgHeight, self.orgWidth = self.img.shape[:2]
        # 幅の小さい方に合わせて画像作成を行う
        self.sizeH = (int(self.orgWidth*700/self.orgHeight),700)
        self.sizeW = (1000,int(self.orgHeight*1000/self.orgWidth))
        if self.sizeH[0] > self.sizeW[0]:
            self.ratio = 1000/self.orgWidth
            # 拡大縮小用の関数
            self.ImgShow = SizeCheck(self.sizeW[0],self.sizeW,self.img)
        else:
            self.ratio = 700/self.orgHeight
            # 拡大縮小用の関数
            self.ImgShow = SizeCheck(self.sizeH[0],self.sizeH,self.img)
        # 画面からのマウスイベント取得用設定
        self.wname = "MouseEvent"
        cv2.namedWindow(self.wname)
        self.npoints = 4
        self.ptlist = PointList(self.npoints)
        cv2.setMouseCallback(self.wname, onMouse, [self.wname, self.ImgShow, self.ptlist])
        cv2.imshow(self.wname, self.ImgShow)
        cv2.waitKey()
        cv2.destroyAllWindows()

        # 変換前後の対応点を設定 p1-p4はそれぞれ対応しているので順番通りに選択が必要
        self.p_original = np.float32([[int(x/self.ratio) for x in self.ptlist.ptlist[0]], \
            [int(x/self.ratio) for x in self.ptlist.ptlist[1]],\
            [int(x/self.ratio) for x in self.ptlist.ptlist[2]],\
            [int(x/self.ratio) for x in self.ptlist.ptlist[3]]])
        self.diff_width1 = np.abs(int(self.ptlist.ptlist[0][0]/self.ratio) - int(self.ptlist.ptlist[1][0]/self.ratio))
        self.diff_width2 = np.abs(int(self.ptlist.ptlist[2][0]/self.ratio) - int(self.ptlist.ptlist[3][0]/self.ratio))
        self.diff_height1 = np.abs(int(self.ptlist.ptlist[0][1]/self.ratio) - int(self.ptlist.ptlist[3][1]/self.ratio))
        self.diff_height2 = np.abs(int(self.ptlist.ptlist[1][1]/self.ratio) - int(self.ptlist.ptlist[2][1]/self.ratio))
        # 幅と高さの小さい方に合わせる。
        if self.diff_width1 < self.diff_width2:
            self.width = self.diff_width1
        else:
            self.width = self.diff_width2
        if self.diff_height1 < self.diff_height2:
            self.height = self.diff_height1
        else:
            self.height = self.diff_height2
        self.p_trans = np.float32([[0,0], [self.width,0], [self.width,self.height], [0,self.height]])

        # 変換マトリクスと射影変換
        self.M = cv2.getPerspectiveTransform(self.p_original, self.p_trans)
        self.img_trans = cv2.warpPerspective(self.img,self.M, (self.width,self.height))
        self.ImgCut = self.img_trans

        self.ImgCutHeight, self.ImgCutWidth = self.ImgCut.shape[:2]
        # 射影した画像のサイズ調整
        self.size = (780,int(self.ImgCutHeight*780/self.ImgCutWidth))

        self.ImgShow = SizeCheck(780,self.size,self.ImgCut)
        # ファイルを元の名称+"-fix"+拡張子にて保存
        basename = os.path.basename(file_path)
        dirname = os.path.dirname(file_path)
        root, ext = os.path.splitext(file_path)
        imwrite(dirname +'/'+ file_Name +'-fix' + ext, self.ImgShow)

if __name__ == "__main__":
    # 引数からのファイルフルパス配列取得
    args = sys.argv
    for i,file_path in enumerate(args):
        # 拡張子取得と拡張子チェック処理
        root, ext = os.path.splitext(file_path)
        if ext.lower() == '.png' or ext.lower() == '.jpg' or ext.lower() == '.jpeg' or ext.lower() == '.webp':
            # 現在のファイル名取得
            file_Name = os.path.splitext(os.path.basename(file_path))[0]
            main = Main(file_path,file_Name)
最後に
射影変換を使用することで画像を正対した状態で表示することができます。応用として斜めからしか撮像できない物体等に対してカメラ座標を使用して正対した表示を動画等でも行うことが可能です。別途記事として作成時には紹介したいと思います。
